Saturday, February 11, 2012

A Year With Jesus: By R.P. Nettelhorst

"Christ's words are of permanent value because of His person; they endure because He endures." 
                                                                                  -W. H. Griffith Thomas

A Year With Jesus is a simple devotional that focuses on drawing lessons and reflections from the words that Jesus spoke. Not stories about Jesus. Not facts and figures. Not Jesus' purposes, or what others said about him. Just His words.

Each devotional covers just one page, short enough to complete in less than ten minutes. As is suggested by the title, the book contains 365 of these quick devotionals. One thing I noticed about this book right away is instead of numbering the devotionals by dates, they simply put "Day 1." "Day 2." and so on, allowing you to start at any time of year.

The book is divided into ten sections, the topics covering: Love and Hate, Truths and Lies, Arrogance and Humility, Friends and Enemies, Belief and Disbelief, Patience and Impatience, Deserved and Undeserved, Good and Evil, Fidelity and Treachery, and Life and Death.

The devotionals start out with an excerpt from Scripture, usually 5-10 verses - something long enough to draw some truth or lesson from, but no so long as to exhaust readers that have trouble with long passages of reading. The devotional part of each day covers the second half of the page, and usually does not extend past a couple of paragraphs.

The author keeps the devotional part of each day's reading short and to the point in order to let keep your focus on Jesus' words. He provides insights on each days Scripture passage, explains the text, and leaves with an application for daily living, or an idea or theme he found in the passage. His ideas and applications are thought-provoking, and although simple, often bring to mind a situation in which I can use a certain verse or concept.

I'd recommend this book to someone who was looking for a daily devotional that would provide a specific study (words of Jesus) and thoughtful insights. You can pick up a copy of the book here.
Disclosure of Material Connection: I received this book free from the publisher through the BookSneeze®.com <http://BookSneeze®.com> book review bloggers program. I was not required to write a positive review. The opinions I have expressed are my own. I am disclosing this in accordance with the Federal Trade Commission’s 16 CFR, Part 255 <http://www.access.gpo.gov/nara/cfr/waisidx_03/16cfr255_03.html> : “Guides Concerning the Use of Endorsements and Testimonials in Advertising.”

Friday, February 10, 2012

A Little Bit about Panama

Panama is a beautiful country with a rich and diverse culture. I am so excited for the opportunity I have to travel there.

Panama has a tropical climate, with two main seasons : Wet and Dry. We'll be visiting Panama during their wet season. The average temperature for Panama during the time we're visiting is between the 70s and 90s, with 80- 90 % humidity. That's definitely way more humidity than I'm used to, but I'm sure I'll survive. :)


Some Panamanian fruits


Panamanian meals are simple, typically including meat, coconut rice, and beans as well as local fruits and vegetables. Some of the most common produce includes yucca, squash, and plantains. Breakfasts often consist of fried corn tortillas filled with eggs, meats and other goodies. Fresh fruit, eggs and toast are often served as well. And, if you're big on coffee, I've heard Panamanian coffee is delicious.  


From an Embera village.


We'll be staying in a hotel that is located in the heart of the tropical rainforest of Panama, near the Panama Canal and the River Chagres. We'll be visiting a few Embera tribes along the Chagras River.


Panamanian sloth


Panama also has many diverse species of animals and other wildlife. Panama is home to many different types of birds, including quetzals, macaws, amazons, parrots, toucans, and the national bird, the harpy eagle. Panama also has many different kinds of monkeys - white-faced capuchins, squirrel monkeys, spider monkeys and howler monkeys. Tropical fish, sea turtles, whales, dolphins, sloths, anteaters, and a host of other interesting animals can also be spotted.

Please continue to pray for my fundraising! Only 142 days left until I leave for the trip. :)


Saturday, February 4, 2012

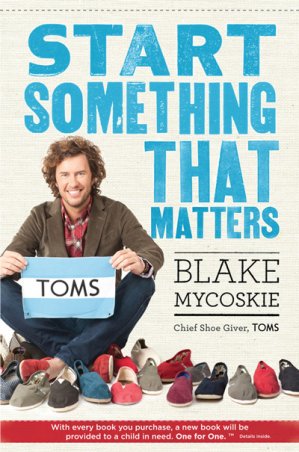
TOMS Book Review and Giveaway!

"To know even one life has breathed easier because you have lived. This is to have succeeded."

Inside each of us, there is a desire to succeed. A desire to make a difference. We don't want to be purposeless and empty. We want to be remembered. We want to do something that matters. We want to change the world. But often, I think we look at it from too broad of a perspective. We sit at home and think, "One person can't make the whole world perfect and fix all of it's problems. I can't fix everything, so I just won't do anything."

In 2006, a man named Blake Myscoskie visited Argentina on vacation. While he was there, he got used to wearing the national shoe, called the alpargata. The shoe was a soft, casual canvas shoe worn by almost all of the local people. Blake loved the shoe, and thought it would have a great market in the United States, but pushed the thought to the back of his mind. After all, he was on vacation - he wasn't supposed to be working. Later on his trip, he met a woman who collected shoes from donors and gave them to kids in need. He was heartbroken to find out that many times they didn't have enough shoes to give out, or when they did, they weren't the correct sizes, and many kids were still left barefoot after her shoe drop-offs.

He wanted to change that. The idea he formed was simple. He would start a shoe company that sold shoes similar to the alpargata. For every pair he sold, he would give a pair of new shoes to a child in need. This was the basis of the TOMS story. In his book, Start Something That Matters, Blake Mycoskie shares his story while creating a guidebook to anyone interested in starting something that matters - something that makes a difference.

He gives six elements that give you somewhere to start as you create your idea, and then he shows you how to apply the concepts and elements. He devotes one chapter to each key trait, focusing on that trait, how he used it, how others are using it, and how you can use it. The six elements he gives are finding your story, facing your fears, being resourceful without resources, keeping it simple, building trust, and giving.

Each chapter is relatively short, but is packed with stories, advice and interesting (and entertaining!) tidbits along the way. Blake Mycoskie brings you along on his journey with TOMS, while showing you how to embark on a journey of your own. All of the chapters include stories from the TOMS business, as well as stories from others who have started their own businesses, organizations and companies. He also mixes in lots of tips on how you can use his six elements for your own dreams and ideas, questions to jump start your brainstorming, and advice and insight he has learned and gained along the way.

The book was definitely encouraging and inspiring. Everyone wants to do something to make a difference - and everyone can. It all comes down to taking the first step. Toward the end of his book, Blake says "The most important step of all is the first step. Start something! What if that idea in the back of your head is a really good one, one that might end up helping tens of thousands of people? You owe it to the world to act. Or maybe it will help only a few people : The same advice applies. ... Just because the first step is a very simple one doesn't mean that it can't lead someday to something profound."

I'm giving one copy of this book away (United States residents only, please)! All you have to do is leave a comment with a link to your favorite pair of TOMS. You can find all of their styles on the TOMS website : http://www.toms.com/. On February 14th, I will randomly choose one comment to win a copy of the book, Start Something that Matters.


*I received two copies of this book free from the TOMS company, one to keep, one to give away. The opinions in this post are mine, I was not paid to review the book, nor was I required to post a positive review.

Friday, January 27, 2012

January Update

Monkey in Panama
Embera Village in Panama

It's almost the end of the month, which means its time for another update. I'll start updating more often as the trip goes closer, but for now, once a month seems about right. As I sat down to write this, I took a minute just to think back over the past month. Looking at things from a day to day, or even from a week to week perspective, it seemed like there hadn't been much going on. However, when I took a minute to look back over the whole month, and give myself a broader perspective, I realized that a lot had changed since I last wrote on here. :)

On the San Blas Islands

First, the original plan was for me to travel to Panama for two weeks. Around the beginning of December, I looked into an extended trip option that the Never the Same Trip was offering, for an optional third week to the San Blas islands. I really wanted to go. I prayed about it, and thought about it, and I finally decided that I needed to go on the extended trip. So I am now heading to Panama for three weeks next July. The first two weeks we will spend in Panama City, and the third week we will spend on the San Blas islands, ministering to the people and kids there, and also doing some work projects for them, much like what we'll do the first two weeks. I am super excited to be able to have this opportunity. It will cost an extra $1480, but I am praying and trusting God to provide - and I'm working on new fundraiser ideas. :)


San Blas Islands


Another bit of progress I've made is I've been able to purchase the plane tickets from here to Miami! I bought them tonight - It took me awhile to find a flight that was compatible with the flight schedules Big World Ventures (the place that organizes the trip for us) had given us, but eventually I did. The airline websites had also been super jumpy, with the prices of the flights changing almost hourly. The cost of the tickets were already up almost $100 more than when I had checked in December, so when I saw they were down this afternoon, I jumped on them. :)

Those are the two  biggest things that have happened over the past month. Hopefully I can get some info. up on Panama and their culture soon.

 156 days to go! :)


**All photos courtesy of Steve Goley (Big World Ventures).

Monday, January 23, 2012

The Sock Bun

The title of this post sounds incredibly odd. I promise it will make sense soon.


Before: This is my natural hair - it has a slight
wave, I suppose, but it's pretty straight.

The Sock Bun is an easy way to get soft curls for your hair without using heat, or much effort at all, for that matter. I naturally have really straight hair, and it does not curl easily at all. I've tried dozens of different techniques trying to get a curl that would stay for more than half an hour, and nothing worked. This was the first style that actually worked.


It's simple, really. All you need is an old, (clean!) knee-high length sock. Thinner socks work better, but I just use a regular cotton sock. Cut the toe part of the sock off.


Then, roll the long part of the sock into a ring.
This is what you will use to create the bun. :)

Next, gather your hair into a high ponytail. The higher you can get it, the better. Tie off the ponytail as usual. For this to work, you want your hair to be slightly damp. Spray your hair with water to get it damp. Use the Goldilocks rule here: Not too wet, not too dry. The "just right" amount of dampness will vary from person to person, depending on how long you want to leave the bun in, and how hard it is to curl your hair. It takes a little experimenting.

The next part is a little hard to explain. Take the rolled-up sock, and slide your ponytail into the hole, as if you were going to use the sock as a scrunchy. Hold the ponytail straight up and down on top of your head. Slide the sock all the way back up to the top of your ponytail, about an inch or so from the very top. Use the hair that is sticking out from the top of the ponytail, and spread it around the sock. After spreading it around the sock, tuck the ends of the hair under the sock. Then start rolling the sock toward the base of your ponytail, gathering hair as you go. As you roll, just continue spreading the hair around the sock ring, and tucking the ends under the sock.
This is how the bun should look when you've
finished. Ignore that random piece of hair
sticking out in the back.
When you reach the base of the ponytail, it will all be neatly tucked into the sock, creating a nice little bun. It doesn't need bobby pins, ponytail holders or anything, the sock will hold the bun in place. The bun actually looks nice too, unlike those annoying foam hair rollers (which never worked for me anyways).


After..
Sleep with this overnight or until the hair in the bun is dry before you take it out. When you take it out, you will have bunches of soft curls.


After: See? Lots of soft curls. I love the
way this worked on my hair. I have it up in a
half-ponytail in this picture.


This is (apparently) easier to do with longer, non-layered hair, of which my hair is neither. I have short hair, and it has all these funky layers in it, so it's hard for me to get all of those pieces tucked into the sock. It takes a little practice, but I got it. And if it's being really difficult, recruit someone to help you make sure you get all the little pieces tucked under. :)

If it's still a little hard to understand how to create the sock bun, check out these videos. I didn't make them, but I used them to figure out how to do it. :) 


*Just a side note: I'm not taking credit for this idea. I found this hairstyle on Pintrest.com, which, if you've never heard of Pintrest you really should check it out.

Saturday, December 17, 2011

Panama, here we come! :)

Ever since I came back from my mission trip to Quito, Ecuador last summer, I'd been thinking about what God wanted me to do. The Never the Same trip for 2012 was going to Panama, and I began to pray about going. Long story short, I got accepted to travel to Panama near the end of August.

Last summer in Ecuador changed my life. (You can read about it here.) I am so excited to see what God has in store for me in Panama.

We'll be doing a bit of the same thing in Panama as what we did in Ecuador. The two week trip begins on July 2nd. We'll all fly to Miami for two days to meet up, learn the drama that we'll perform in Panama, and also do some language and cultural training. Then, we'll all fly together to Panama City.

Once in Panama, we'll minister to people through our drama in parks, schools, churches and neighborhoods. We'll also have the opportunity to do work projects for them.

I am so ready to see what God has planned for all of us going, and for the people of Panama as well. I hope you'll enjoy following along with me.

Saturday, November 12, 2011

How to Host an Operation Christmas Child Packing Party!


If you've never heard of Operation Christmas Child (OCC), it is an project by Samaritan's Purse where you fill a shoebox with toys and other simple items as gifts for a young boy or girl in an impoverished country. You can find out more on the Samaritans Purse website, and you can read about my packing party  here.

I encourage you to get involved with OCC by packing a few boxes this year. If you've been involved for a few years, and want to do something a little more, hosting your own packing party is a great way to do that! It's really not as hard as it seems, and it's a lot of fun for everyone involved!

1.) Decide all of the normal party details.

 - Where will you host the party? We had the party at my house, but you may want to have the party at a bigger or more accessible location.

-Who will you invite? A good number of guests depends on how many shoeboxes you plan on making, how long you will be packing for, and how big your space is. I ended up having seven girls (counting myself), although I invited a lot more. Another thing to take into account is that some people may not be able to come, so plan accordingly when you make your guest list.

-When will you host your party? Obviously, weekends work best. Try to pick a day where you can have a whole morning or afternoon free. Which leads to the next question...

-How long will your party last? Again, this really depends on how many boxes you're planning to pack, and how many people will be there. My party lasted 4 1/2 hours, with seven people, and we were able to pack 108 boxes.


Next, decide some more shoebox-related things for your party.

-What is the goal of your party? How many shoeboxes do you hope to pack?
-How will you collect items to fill the shoeboxes with? Likewise, how will you collect shoeboxes?

-Do you want to pack all types of shoeboxes or focus on just one age range/gender category?

The goal of our party was 160 boxes. The number stemmed from the fact that I will be turning 16, so since 16 was much too small for us, we just added a zero. I felt it wasn't an unreasonable number, but something still quite large to reach for.

I decided that all of the party guests could bring items to donate to the shoeboxes. Of course, I picked up as many items as I could. I spread the word about the party amongst my friends and church, and many, many people donated items. Their donations were so vital, and the party could not have been such a success without them.


'GO' Box

For shoeboxes, a good idea might be to purchase "GO boxes" by Samaritan's Purse (find them here). They are not too expensive, and depending on how many shoeboxes you need, they could be an awesome resource. I went around to a few local shoe stores about a month before the party, and asked if they could donate empty shoeboxes for this project. One store did, and I ended up getting about 60 boxes from that store! :) The rest were donated from family and friends, and we ended up buying some plastic shoebox-sized containers from Target as well.

I also decided that we should pack shoeboxes for all of the age-range/gender category. This gave us six categories :

Shoe box labels

   *Girl, 2-4 years
   * Girl, 5-9 years
   * Girl, 10- 14 years
   * Boy, 2-4 years
   * Boy, 5-9 years, and
   * Boy, 10-14 years.


When you have all of this decided, you should start collecting supplies for the party as soon as you can. The more time you have, the better chance you have of reaching your amount of needed items.

2.) Next steps, a few weeks before the party:

- Create and mail invitations for your party. List all the usual party info (Time, Date, Place, Etc.), but also explain what the party is for and what you will be doing. If guests need to bring something, let them know, and be specific! "Bring shoebox packing supplies" may not be helpful. List some ideas of things to bring (You can get ideas from the Samaritan's Purse website), or assign each guest to a specific item or age group. Don't forget to mention what NOT to bring. Think about whether or not you'll want to include letters/photos in your shoeboxes. The kids receiving the boxes really enjoy getting letters inside, and if you include your address, they just might write back! I received a letter last year from Africa. (: If you do want to include letters/photos, you'll want to tell your guests to bring some wallet-sized photos of themselves. Or, you could plan to take pictures at the party.

- Order supplies from Samaritan's Purse. They have so many great resources that were a big help to my party. I ordered a Project Video and Resource DVD and a Party Pack. The party pack included stickers, prayer bookmarks, a hosting guide, and a bunch of other fun supplies. The DVD has 30+ videos and clips you can show at your party (not to mention having a good time watching them all by yourself!).

- Shop. Try to figure out how many items you will need, and plan accordingly. I've found that my average amount of items per shoeboxes is between 15-20 items, depending on the size of the box. If your goal is 100 shoeboxes, that means you'll want to collect at least 1500 items. Don't be afraid to ask for donations! (: Family and friends might be more than willing to help you shop, and local businesses might help too. For example, our dentist was able to donate a bunch of toothbrushes and tubes of toothpaste for us to pack.

- Shipping donation. Decide how you will raise money for the $7 shipping donation for your boxes. There are a number of ways you can do this, whether through fundraising, or asking your guests to donate, or coming up with a creative way of your own.

- Drop-off. You'll also need to figure out where and when you will drop off your boxes. We brought ours into our church the following Sunday, since our church was collecting shoeboxes from congregation members and storing them until National Collection Week. During National Collection week, you can find a drop-off location near you, or you can ship your boxes year round to the National Distribution Center.

3. A week before the party:

 - Check your guest list. Call people if they haven't RSVP'd. It makes party planning so much easier if you know what size group you are planning for.

- Start figuring out how you will set up your space. I'll explain more about how we did this at my party in a bit. You'll need to decide how you'll set up the items to use, where you'll be packing, and where you'll be storing finished shoeboxes.

- Check to make sure that you have all the materials you will need.

- Determine a schedule for your party. Like I said earlier, you'll probably want to spend a few hours packing boxes. It is really a lot of fun, and the time will fly by! I'll talk a little more about our schedule for the party later.

4. Setting up the Party:

  - We decided to go with an assembly line set up, as it seemed the easiest and most efficient. We had it loop through a few rooms in our house (haha) since we needed so much space.

    Our first station had all of the empty shoeboxes stacked in piles, and a table for wrapping them. Some people love to wrap their boxes, some don't. Either way is fine. We didn't wrap many of our boxes, because we had a big goal, with not that much time. We still had the option anyways (and yes, a few boxes did get wrapped).

   Next, we had two long tables with all of the items stacked and sorted on the tables. We sorted them out into these sections:
     *Necessities (socks, clothes, soap, combs/hairbrushes, washcloths, clothes, etc.);
     * Toys : Girl (hair ponies, headbands, clips, toy jewelry, plastic princess tiaras, etc.), Boys: (Cars, balls, etc.) and toys that would be good for either gender (jump-ropes, stuffed animals, kazoos, harmonicas, yo-yos, Slinky's, stickers, etc.);
     *School Supplies (pens, pencils with sharpeners, markers, crayons, coloring books, notepads, erasers, etc.); and
     *Candy (gum, mints, hard candies, lollipops... no chewy or sticky candy, nothing that can melt or spoil, no chocolates. Also, all candies must be double bagged.)
 
Table #1
  We also had bags and boxes of items under the tables, since they weren't quite large enough to hold everything. Another idea is to get large bins, boxes or tubs to put your items in, rather than just setting it out on the tables, like we did.

Finally, we had a table with letter writing supplies, boy/girl labels, and rubber bands, for finishing off our boxes. When the boxes were complete, we decided to stack them against the wall in the hallway, so they would be out of the way. We designated a small section of the hallway for each person, so they could each see their stack of shoeboxes they had packed grow.

5. Party Time!


Part of Table #2
 Our party was a lot of fun, and we packed over 100 shoeboxes, although not quite 160. (: Start off by showing your guests where to put the items they brought. Next, we watched two short videos from the Resource DVD I received from Samaritan's Purse. After that, I explained how the assembly line process would work, and we opened up in prayer.

A couple of people at our party were new to making boxes, so I made sure to go over basic filling instructions, like making sure to wrap the box and lid separately, remembering to tape a label to the box when finished, how to decide what should go in your box, etc.

We packed until all of our supplies were gone, and then we gathered around the boxes for group pictures and prayer. One of the most important things you can do is pray over your completed boxes. Pray for the children receiving the boxes, their families, and their communities. (:

As everyone was leaving, I handed out the prayer bookmarks included in the Party Pack, and I also made certificates for everyone that came. You can find certificates to use on Operation Christmas Child's website.

A few more ideas for your party:

- We played Christmas music in the background. It was only mid-October, but it didn't matter. We were packing Christmas gifts, after all.

- Have snacks set out for everyone to munch on while packing. Just be careful to have nothing too messy, you wouldn't want to spill something on a shoebox gift. We had M n' M's and Chex Mix.

- Take lots of pictures! We had such a good time, and now I'm glad that we took pictures of it. Being able to look back on what we did, how we set things up, and so on, gives me new ideas for next time.


Just some of our finished shoeboxes! You can see the signs on the wall
with each persons name, and their stack of boxes.
 So there you are. A (hopefully) simple guide on how to host an OCC packing party. Please let me know what you thought in the comments below. Have you had a shoebox packing party of your own? How many shoeboxes did you pack? Do you have any creative ideas for others hosting their own party?